You get hundreds of emails a day. While you need email to effectively communicate with clients and colleagues, notification emails and spam dilute your inbox and distract from what’s important. I’ve compiled some quick Outlook organization tips that help me sort through the noise and prioritize the information I receive.
Quick Outlook Organization Tips
There are endless ways to customize your Outlook mailbox. You can set up the following Outlook organization features in under 5 minutes to take back your inbox:
Focused Inbox
Focused Inbox is Microsoft’s replacement for Clutter — an email sorting functionality in Outlook. As the improved Outlook organization feature, Focused Inbox automatically prioritizes messages into two folders: Focused and Other.
The feature sends emails and contacts you frequently interact with to your Focused folder, and filters automatically generated or bulk email into the Other view. As you continue to sort and reclassify emails, Focused Inbox learns your preferences.
To prevent emails from getting lost, Outlook notifies you about messages sent to the Other inbox, and you can easily navigate between the two.
To set up Focused Inbox in your Outlook mailbox, navigate to the View tab in Outlook 2016 and select Show Focused Inbox. To modify how Focused Inbox classifies your messages, follow these steps:
- Select the Focused or Other tab in your inbox and right-click the message you want to move.
- Choose either Move to Other or Move to Focused. You can also choose Always Move to Other or Always Move to Focused to ensure all future emails from that contact go to the appropriate folder.
Outlook Rules
If you drag messages sent from certain people to other folders in your Outlook Mailbox, why not automate the process? You can set up custom rules so if you receive a message from “Sender A,” it will automatically move to the “Sender A Folder” in your inbox. This is also ideal for automated alert emails that may not require immediate attention. Here’s how to accomplish this with Outlook rules:
-
Locate a message in your inbox that fits this rule.
-
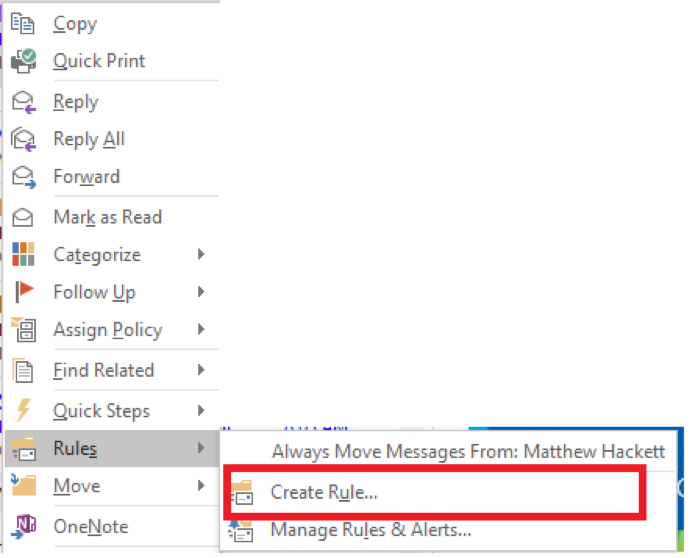
Right-click on the message and select “Create Rule” as seen in the screenshot
-
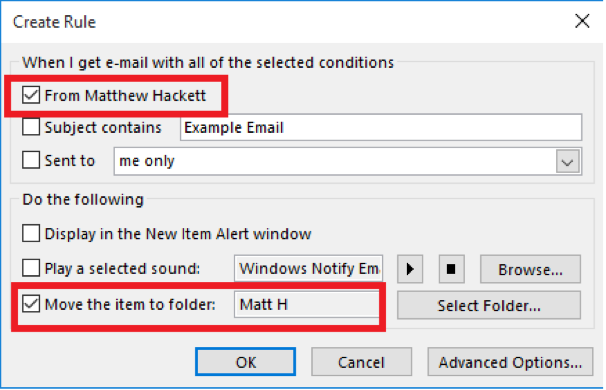
In my example, I sent myself a test email, so I am both the sender and the receiver. I would like to move all messages FROM Matthew Hackett to the folder I created for myself, called “Matt H” as seen in the screenshot below.
-
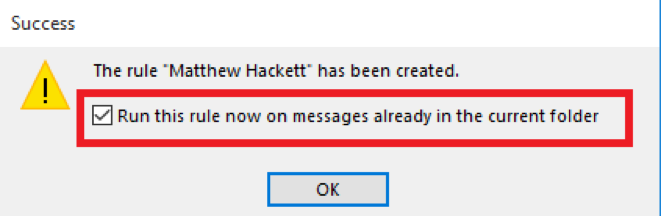
Click OK to apply the setting, at which point you’ll see another Window. Selecting and running this will grab any additional message from Matthew Hackett and move it to the “Matt H” folder.
-
Here you can see my message has been moved to the “Matt H” folder.

Outlook Conditional Formatting
Outlook Rules can be a bit aggressive, and important emails can slip through the cracks. If you prefer to have all emails come straight to your Inbox, Outlook Conditional Formatting is another top Outlook organization tip to sort mail by importance.
Looking for more email automation tips? Learn how to automatically create disclaimers in all outbound email.
Typically, if an email is sent to me and only me, it requires a response or at least my attention — so I want the message to stand out. You can accomplish this through Conditional Formatting and adding a color to these types of messages as seen below.
Here’s how to set up Conditional Formatting in your Outlook mailbox:
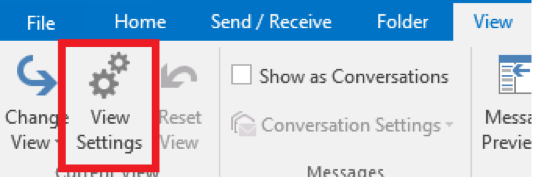
- In Outlook, under the “View” tab, select “View Settings.”
-
Next in the dialogue window, select “Conditional Formatting.”

-
You’ll see in the next window there are some general rules already populated in Outlook. We’re going to click “Add” to create a custom rule.
-
I call my rule “Sent to Only Me.” By clicking on “Font” I simply change the font color from Black to Blue.
-
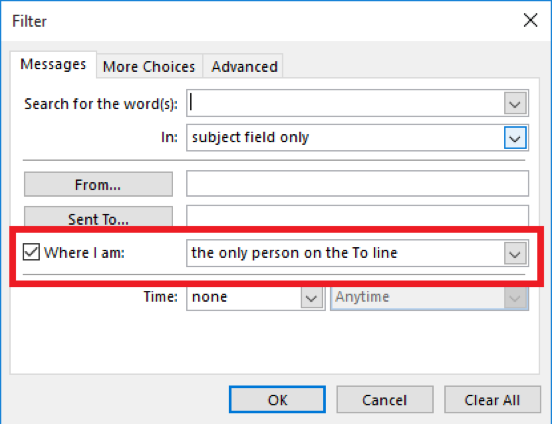
Under the “Condition” filter, I select “Where I Am: the only person on the To line.”
-
By clicking “OK” on all the dialogue boxes, the settings will save, and you will notice your Inbox is a bit more colorful.
Consolidating your Outlook mailbox can save you time and energy and direct your focus to the most critical issues of the day. These are just a few Outlook organization features you can set up in your Outlook mailbox in under 5 minutes; there are thousands of ways to customize your Outlook experience to best suit your needs.
_**What other tips do you have for cleaning up your Outlook mailbox? We’d love to hear them in the comments below!
**_ Matt Hackett Service Desk Manager
Published on: .