Automate Security with Cloud App Security and Microsoft Flow
Automating Security with Cloud App Security and Microsoft Flow. In this Tech Talk we are once again joined by Microsoft Technical Solutions Archi...
Automating Security with Cloud App Security and Microsoft Flow
In this Tech Talk, we are once again joined by Microsoft Technical Solutions Architect David Branscome, who discusses how to automate security using Cloud App Security and Flow. David first joined us back in November with an excellent talk on enabling compliance policies in Microsoft Teams. You can check out David’s Blog at www.cloudyhappypeople.com to keep up with what he has been working with.
What is Microsoft Flow?
Microsoft Flow is a low-code/no-code automation platform that allows you to create simple automated and integrated workflows and connections with a few clicks, as well as enabling API integrations with just a bit of copy-and-paste. Similar to other task and workflow programs like Zapier and IFTTT, Flow has the benefit of being free for most Office 365 licenses and having deep integrations with most Office products. Although you can tie any API into Flow, it is easiest to use with its hundreds of built in connectors such as:
- MS Word, Excel, Sharepoint, Teams, Power BI, etc.
- SalesForce
- ServiceNow
- Slack
- WordPress
- Jira
- GMail + Google Drive, Sheets, Calendar, and Tasks
- GitHub
- See the full list of connectors
What is Cloud App Security?
Cloud App Security is a security platform that works across SaaS apps, allowing you to secure information even outside of Office 365. While it is technically a cloud application security broker (CASB) it is also a bit of a Swiss Army Knife of features including:
- Identifying and blocking Shadow IT
- Identifying suspicious user behavior like mass downloads or impossible travel.
- Data Loss Prevention
- Enforcing compliance policies to guard sensitive information
- Identifying, and providing intelligence on over 3300 SaaS apps, web apps, hosting providers and more.
How do Cloud App Security and Flow Work Together?
Cloud App Security already has the ability to proactively and automatically enforce policies, such as classifying documents and messages that contain sensitive data such as credit card numbers, health plan IDs or social security numbers. You can can also use it to notify admins or turn off user-access for policy violations or suspicious behavior. (No way Megan is logged in from Moscow and Texas at the same time.) By integrating CAS with MS Flow, you gain the ability to trigger actions in outside applications. You can create a ticket in your support deck software to review something, you can send a message to a channel in Teams, or you can even set up one click responses via SMS or email, where a notified admin can just click the response they want to take. With simple logic blocks and the ability to work with HTTP endpoints, the sky is the limit.
Step 1: How to Connect Cloud App Security with Microsoft Flow
• Verify licensing for Flow and CAS (Cloud App Security • Create API token • Create new flow • Configure CAS trigger and select “when an alert is generated” • Paste API token in authentication settings
Automatic Ticket Generation from Cloud App Security Alerts
The first demonstration David gives is how to automatically generate tickets in ServiceNow when there is a new alert in Cloud App Security. The linear workflow is easy to follow and shows how to initially set up you connectors. The flow is as follows:
- When a new alert is generated:
- Post a message to a channel in Teams
- Create a new record (ticket) in ServiceNow
- Send an email
Setting it up
Step 1: Generate your API token in Cloud App Security
- Go to portal.cloudappsecurity.com (You need to be logged in with an admin account)
- Click the settings icon the upper right hand corner
- Select “Security Extensions”
- The first tab is “API Tokens”
- Click the blue + button on the upper right hand corner of the token list
- Name your token
- SAVE YOUR TOKEN. As with all API tokens, you want to save this in a secure place
Step 2: Create your trigger in Microsoft Flow
- Go to Flow.Microsoft.com
- Click “My Flows” in the left sidebar
- Click the ”+ New” button in the upper right hand corner.
- Select “Create from Blank”
- In the splash screen, “click create from blank” again.
- In the connector search bar, search for Cloud App Security”
- Select Cloud App Security
- Select the trigger, “When an alert is generated”
- When prompted, enter your API token
- Click the new step button
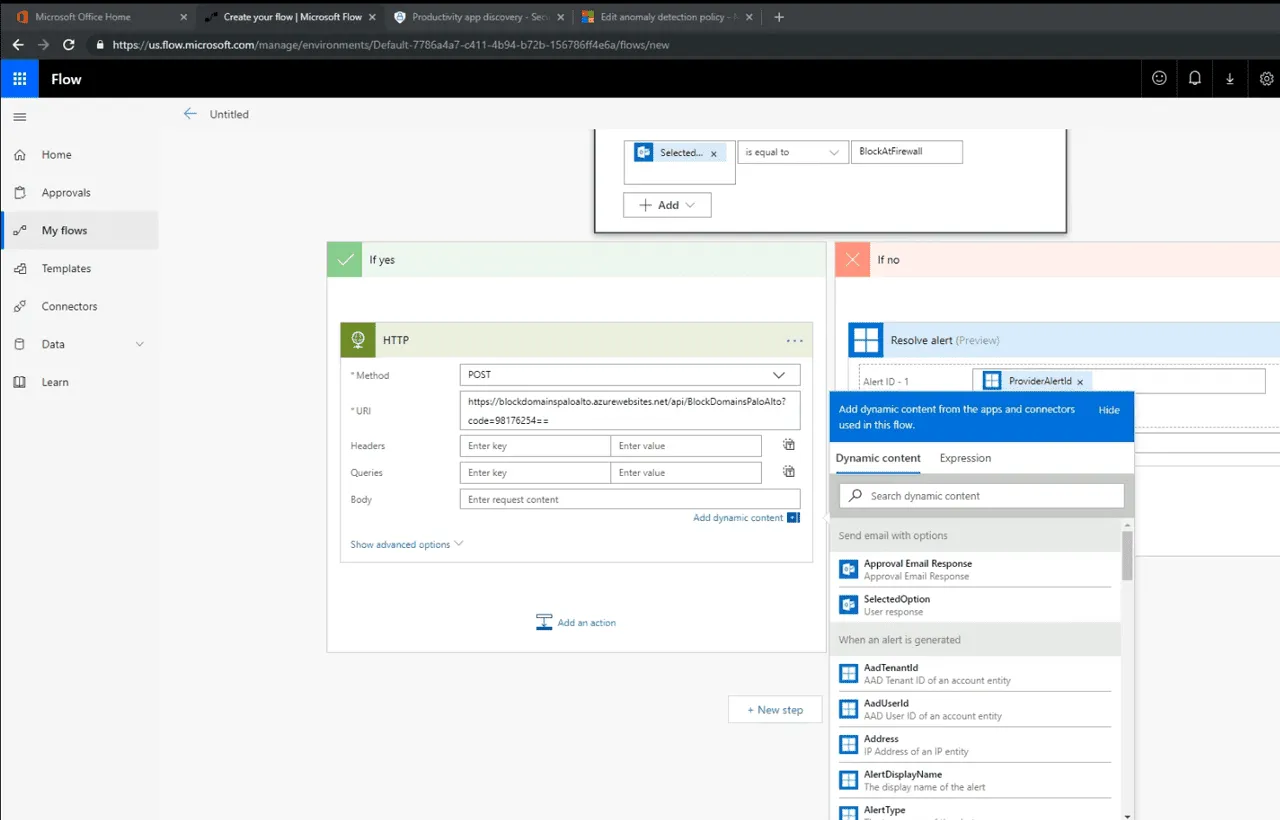
Step 3: Create the Teams message action in Microsoft Flow
- Under choose action, search for Teams in the search bar.
- Click the Microsoft Teams icon
- Under Actions, select “Post Message”
- Select Team ID (Will pull information from your instance of teams)
- Select Channel ID (Will also pull information from teams)
- Enter your message
- Once you click in the message box, you will be given a menu that lets you select Dynamic Content or Expressions
- The dynamic content list gives you any information available from the CAS alert.
- Click Alert Display Name, and Alert Category. (These will create blocks in the message box. You can enter any ancillary information you want here as well.)
- Click the new step button
Step 4: Create the ServiceNow Ticket Action in Microsoft Flow
- Search for ServiceNow in the search bar.
- Click the ServiceNow icon
- Under actions, select “Create record”
- Name this connection
- Enter your ServiceNow instance name
- Enter your ServiceNow username (We suggest creating a dedicated account to run automations)
- Enter your ServiceNow password.
- Select the type of record to create. (For this, David choose “Password reset request”
- You will be given a large number of fields that are mapped to your ServiceNow account.
- In each field, you can add dynamic content from MCAS.
- Once you have filled in your desired fields, click “Create new step”.
Step 5: Generate an eMail in Microsoft Flow
- Search for Outlook in the search bar.
- Select Office 365 Outlook
- Under actions, select “Send an email”
- Enter Recipient
- Enter Subject
- Enter Message body
- Note: All fields here can use dynamic content.
- Click Save
- Now that the flow is made and saved, you can rename it by clicking on the descriptor in the upper left hand corner.
Connecting the Flow in Cloud App Security
- Go to portal.cloudappsecurity.com
- Click “Control” in the left sidebar
- Select Policies
- Find the event/policy that you want to trigger the flow (Or create a new Cloud App Security Policy)
- Select it
- In the Alerts section, click the box next to “Send Alerts to Flow”
- In the select Playbooks dropdown, choose the name of the flow you created earlier
- Click update
Blocking Shadow IT on the Firewall with Cloud App Security and Flow (with one-click approval notification emails)
In the the second demonstration, David takes it a step further and uses some if then logic, and used a JSON file and HTTP push request inflow to block unsanctioned applications from the fire wall. In this case:
- When an alert is generated
- Send an email alert with 2 options:
- if Block at Firewall
- then use HTTP Post method to block the domain as specified by cloud app security
- if Resolve Alert
- then automatically resolve the alert with a message explaining how it was resolved.
- if Block at Firewall
- Send an email alert with 2 options:
Watch the demo to see how it’s done:
About Agile IT Tech Talks
Agile IT Tech Talks are weekly sessions where we bring in subject matter experts for short, highly focused educational segments, followed by up to an hour of open Q&A where Agile IT clients can discuss their own environments with our engineers and a group of peers. While we release the demos and sessions on our blog, the Q&A benefit is only available to Agile IT Managed Service and Cloud Service Customers. Agile IT is a four time cloud partner of the year and offers fully managed security as a service. To find out more, schedule a free call with a cloud service advisor or Request a Quote