Azure Information Protection Demo (Video)
Discover Azure's data security capabilities with our detailed video demo on Azure Information Protection. Safeguard your data seamlessly
Tech Talks are a weekly opportunity to learn how to do more, and do it securely with your cloud software and services. Each week, we host a short talk from a subject matter expert, followed by a community driven Q&A where Agile IT’s clients can ask our engineers any of their most pressing questions. This is a free service for our clients.
September 6th’s Tech Talk featured Jon Wojan, Microsoft Technical Architect - Security and Compliance Architect, who did a feature walk through and demonstration of Azure Information Protection.
What is Azure Information Protection?
Azure Information Protection is similar to Cloud App Security, but is much more powerful. While Cloud App Security protects data in Office 365, Azure information Protection can be expanded to protect data across cloud and on-premise infrastructure.
Microsoft is unifying the security and information protection features of Azure Information Protection, Cloud App Security and Windows Information Protection into a standard and unified feature set known as Microsoft Information Protection (MIP) that will provide a single place to manage your data and security.
Why is Information Protection Necessary?
As exemplified by the NSA / Edward Snowden incident, information is the primary motivation layer for adversaries. It is generally easy for information to be moved from an organization. Once the data leaves your systems, the data is no longer yours unless defenses are in place.
As the world changes, do does the way we access, create and use data.
- 41% of employees say mobile business apps change the way they work. This included unauthorized applications that present a shadow IT threat.
- 85% of organizations keep sensitive information in the cloud.
- 88% of organizations no longer have confidence to detect and prevent loss of sensitive data.
- 58% have accidentally sent sensitive information to the wrong person.
Azure Information Protection Demo
How does Azure Information Protection Work?
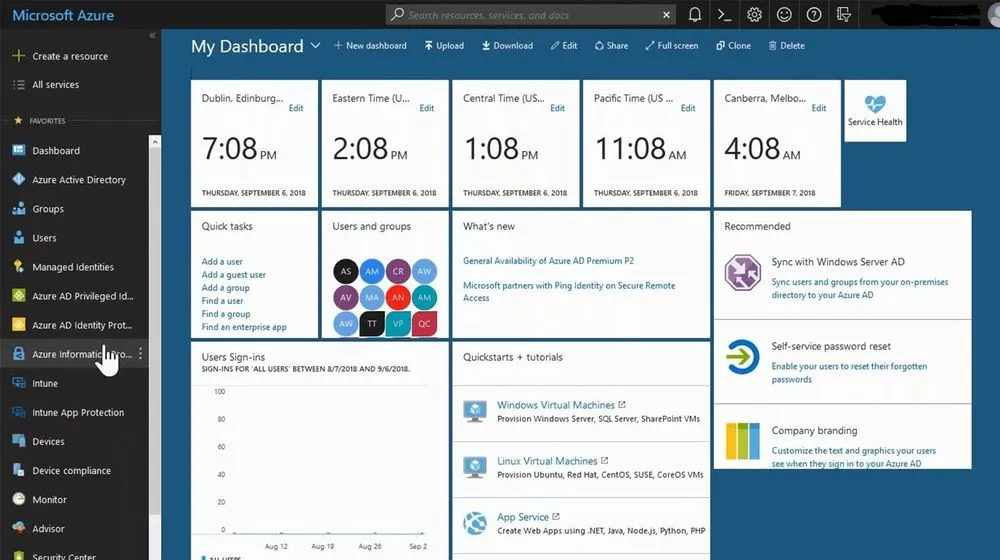
You can access your Azure Information Protection tenant through portal.azure.com. Azure information protection allows an organization to classify and protect documents and emails by applying labels. These labels can be applied automatically with rules and conditions, manually by users, or a combination of the two where users are notified if their documents or emails contain sensitive information.
These labels can be configured to control access, apply identifying watermarks, control offline access, and even set expiration dates on time sensitive materials like price lists or pre-earnings calls discussions.
Labels in Azure Information Protection
AIP provides five top-level labels to help classify data.
- Personal
- Public
- General
- Confidential
- Highly Confidential
These are global groups. More global groups can be created, but labels can also be created that operate on a group level. This allows policies to be set based on team, or project membership.
Labels can also be created with time-constraints, which is particularly useful if you work in Mergers and Acquisitions, as it allows you to set policies just for a specific window during the M&A process and restrict data to only those who have a need to know during the project.
Set permissions for documents and emails containing the label
By clicking protect, you are able to adjust the protection settings to adhere to your own policies.
Configuring labels in Azure Information Protection
Specify how the label is displayed in the AIP client on user devices. Often, you will want members of your organization to be able to label the documents they create. However, in some cases, such as social security numbers in emails, you only want to set up alerts and automatic blocking. IN addition to the display name, you can apply a color code to the label, making it easier to see more sensitive data at a glance.
Cloud Key vs HYOK (AD RMS)
Cloud Key utilizes your Azure or Microsoft 365 identities to manage information access. HYOK (Hold Your Own Key) AD RMS (Active Directory Rights Management Service) HYOK is useful if you want to maintain ownership of your keys to assure that you remain the root of authority.
Users and permissions
These are the users who will be included in the new label settings. As almost always, it is better to apply these settings to a security group rather than an individual user, to prevent having to change access rights in numerous places if a person’s access rights are changed or revoked.
Content expiration
If you work with time sensitive information, you can set content with a specific label to expire on a specific date or by since it was tagged. This can be valuable to pre-earning call financial information, price lists shared with a client, and even proposals that expire a certain amount of time after they are created.
Allow offline access
Designating the amount of time that a file is available without internet access is a matter of balancing security and flexibility. While setting this to 0, and requiring internet access to verify the right to view content is more secure, it also renders to document unreadable is somebody lacks connectivity (During a plane trip, or during a network outage)
Set visual marking
You can apply watermarks, headers and footers labeled information. While the watermark will most likely say, “(confidential, secret, etc) the header and footer of the document is a useful place to remind team members and stakeholders about policies in place regarding the labeled information type.
Configure conditions for automatically applying this label
Azure Information Protection allows you to set automatic conditions for applying a label and its associated policies. These can be chozen from pre-existing patterns, such as those that identify Credit Card Numbers, Health Insurance Claims Numbers, or you can create your own.
In the demo Jon creates a condition based on the project name, Aurora, that will automatically apply the label if the word Aurora appears more than two times in any document.
Azure Information Protection Client
In order for Azure Information Policies to work, your end users must have the Azure Information Protection client installed on their workstations. You can download the Azure Information Protection viewer app and client here. Instructions are available here. We strongly suggest that enterprise admins use Microsoft Intune to install the AIP client across their organization.
Azure Information Protection for End Users
With the AIP client installed, users will now have an additional button in their Home bar in Outlook, Word, PowerPoint, Excel and other supported applications. By default they will also have the sensitivity menu bar showing available labels. 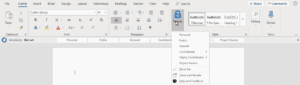
With automatic policies in place, even new documents that are created will have the specified labels and their associated policies applied as soon as they are saved. If somebody then tries to remove the label, this action can require them to explain why they want to remove the label, or even prohibit the removal of protection from the file.
Azure Information Protection and Cloud App Security - Better Together
While many of these features may seem similar to those shown in Cloud App Security, Azure Information Protection works outside of Microsoft 365, allowing you to even protect on-premise files and data. However, if you integrate Cloud App Security with Azure Information Protection, you gain a single window to see policies, files, actions and alerts. To find out more, watch our demo of Cloud App Security.
The great thing about Azure Information Protection is the ability to inspect any file that Windows can index by using the Azure Information Protection Scanner. This can include on-premises SharePoint servers, SMB file shares and even workstations. The scanner can be set to just passively identify sensitive data, or can apply the labels you have configured. The AIP Scanner does NOT run in real time. Instead, it crawls through data stores you specify. You can configure this process to run once, or to run on a schedule. Find out more about Configuring the Azure Data Protection Scanner.
Integrating Azure Information Protection with Cloud App Security
Setting up Cloud App Security to use labels configured in Azure Information Protection, is a simple process.
- In Cloud App Security click the settings icon the click General Settings.
- In the Azure Information Protection section, click the box for “Automatically scan files for AIP classification labels”
You can find more information on managing Azure Information Protection and Cloud App Security together, you can read Microsoft’s CAS documentation here.
Secure Your Environment
Security, Data Protection, and Compliance is Complex. Agile IT can help you by evaluating your current security posture, configuring your systems and even managing your security and compliance road map. Schedule a free 30 minute consultation with a Cloud Services Advisor to find out more.