Creating an Office 365 Mailbox in a Hybrid Configuration
When working with customers in Exchange hybrid configurations they often have questions about creating Office 365 mailboxesin Exchange Online Your...

When working with customers in Exchange hybrid configurations, they often have questions about creating Office 365 mailboxes in Exchange Online. Your organization might have existing processes for adding new users that will likely need to adapt to Office 365 after the migration.
In this guide, we’ll discuss the different methods of creating Office 365 mailboxes in an Exchange hybrid configuration.
Options to Create Office 365 Mailboxes
There are two ways to properly create an Office 365 mailbox in an Exchange hybrid configuration. One is via a more user-friendly GUI and the other is through Exchange PowerShell (for those of you who love automation).
Here’s how to create Office 365 mailboxes using both methods:
Option 1: Add New Users in the Exchange Admin Center (Exchange 2013 and 2016)
This is the simplest way to create an Office 365 mailbox. The process of creating an AD user and setting up the mailbox can be completed in one place and in one step.
The main disadvantage of the Exchange Admin Center is that it only lets you create a new Active Directory account for the user. To create a mailbox for an existing AD user, you’ll need to use PowerShell. Alternatively, you could give that user an on-premises mailbox and then migrate the mailbox to Office 365.
Here’s how to get started using the Exchange Admin Center:
- Log into the Exchange Admin Center here: https://mail.contoso.com/ecp.
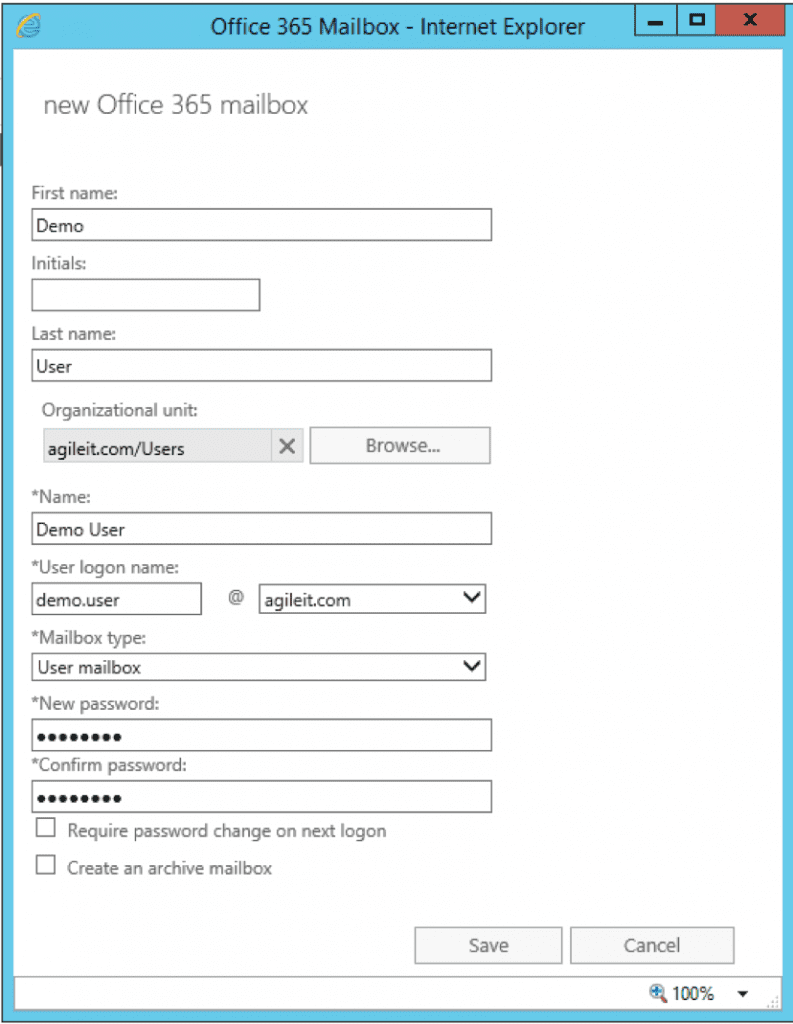
- In the Exchange Admin Center of your on-premises hybrid server, jump over to Recipients > Mailboxes and hit the plus sign right above the “Display Name” column. You’ll notice one of the options is a new “Office 365 mailbox.” ![Office 365 mailbox hybrid] (/wp-content/uploads/2016/11/hybrid-office365-300x188.png)
- Complete the information in the Dialog Box and click Save. Once saved, you can edit the user’s mailbox properties to add information such as title, manager, address and phone number.
If you’re creating an Office 365 mailbox this way, there’s no need to set up an AD account for the user beforehand. As part of this process, Exchange automatically creates the AD object for the user in the OU you specify. Simply fill out the details and click save.
4. Sync the directory using AD Connect.
On the next synchronization of AD Connect (either automatic or forced), your user will show up in Office 365 and an Exchange Online mailbox provisioned shortly after. Once the user is synced, you’re free to assign the appropriate license to the account.
To force a manual directory sync, log in to the Azure AD Connect server, open an Administrative PowerShell window and execute the following command:
- Start-ADSyncSyncCycle -PolicyType Delta
5. License the User.
- Browse to https://portal.office.com
- Click the tiles icon and select the Admin tile
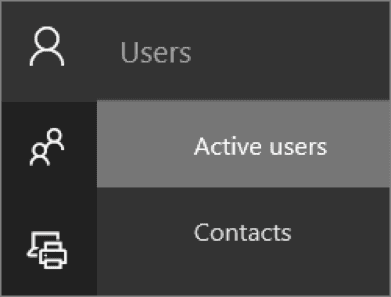
- Navigate to Users and select Active users
- Select the user in question, locate the Product Licenses field and click Edit
- Choose a location then click the slider to activate an available license
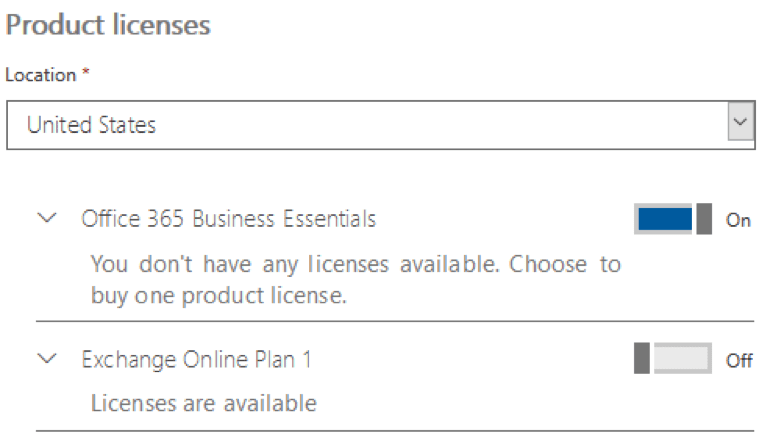
- At the bottom of the Product licenses pane, click Save
Related Content: What to Consider in an Office 365 Hybrid Exchange Deployment
Option 2: Use Exchange PowerShell (Exchange 2010, 2013, and 2016)
You would use the Exchange PowerShell method for one of two reasons: to automate account provisioning or to grant an Office 365 mailbox to an existing AD user. You can also use this method to add Exchange Online mailboxes to the view in the on-premises Exchange Admin Center.
To create an Office 365 mailbox for an existing user, the command we’ll be using is enable-remotemailbox.
A general example would be: [code language=“PowerShell”] enable-remotemailbox -Identity <UserIdParameter> -remoteroutingaddress <ProxyAddress> [/code] 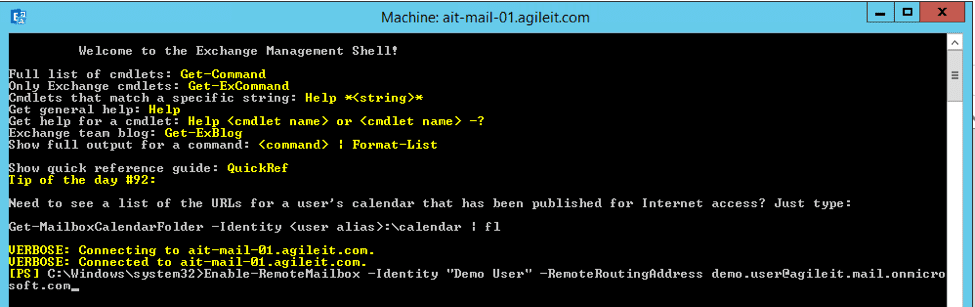 More specifically, for the demo user from the EAC instructions, we would use enable-remotemailbox -identity “Demo User”-remoteroutingaddress [email protected].
The proxy address will always be @tenant.mail.onmicrosoft.com
Why Use These Methods to Create an Office 365 Mailbox?
It’s possible to simply create the Office 365 account in Active Directory, wait for AD Connect to sync the user to Office 365 and license the account. But creating new mailboxes this way never fills in the correct Exchange attributes on the user’s AD account, which causes them to not display in the local EAC.
This could also cause the inventory of your on-premises AD Connect domain and Azure AD domain to show incorrect data and conflicting information.
We hope you found this guide helpful for creating new mailboxes in your Office 365 hybrid configuration.
Have more questions or need help managing your hybrid Office 365 environment? Agile IT is a proven expert in Office 365 cloud migration. We offer affordable migration plans that get you to the cloud seamlessly, on time and on budget.