Publishing Outlook Web App and Exchange ActiveSync with UAG
UAG Publishing fromPublishing Exchange Server 2010 with Forefront Unified Access Gateway 2010 and Forefront Threat Management Gateway 2010ht...

UAG Publishing from:
Publishing Exchange Server 2010 with Forefront Unified Access Gateway 2010 and Forefront Threat Management Gateway 2010
(Need assistance with your on-premises Exchange environment? Learn about our on-prem Exchange Consulting.)
Publishing Outlook Web App, Outlook Anywhere, and Exchange ActiveSync Using Forefront UAG
In this walkthrough we will be configuring Forefront UAG to publish Exchange Server 2010 to the Internet. We will again be using forms-based authentication at Forefront UAG for Outlook Web App, Basic authentication for Outlook Anywhere and Exchange ActiveSync, both authenticated at Forefront UAG. Forefront UAG will be publishing a farm of Client Access servers in one Active Directory site. The following diagram outlines the topology.

Server and Software Prerequisites
The following prerequisites for the configuration should already have been configured:
· Exchange 2010 deployed in one (or more) Active Directory sites.
· Forefront UAG 2010 installed on a Windows Server R2 domain-joined computer with two network interfaces: one facing the internal network, and one facing the public network. The Forefront UAG installation wizards make installing Forefront UAG simple. It’s good practice to name each network adapter in the Forefront UAG server according to the network it’s connected to, for example ‘internal’ and ‘external’, This makes configuring them in Forefront UAG much easier.
Certificate Prerequisites
Just like when you configure Forefront TMG, certificates are used on the server publishing Exchange. For detailed instructions about how to plan certificates, see the TechNet Library, including White Paper: Exchange 2007 Client Access and SSL. For the purposes of this walkthrough, it’s assumed the planning exercise has resulted in the following configuration:
· Split DNS is configured, that is the same domain name exists both inside and outside the company network in DNS. The domain name used for this walkthrough is fabrikam.com.
· A host record—mail—has been created to enable Exchange to be published to the Internet. Mail.fabrikam.com will be the name all clients use to reach Outlook Web App, Outlook Anywhere and Exchange ActiveSync.
· The certificate lists the mail.fabrikam.com name as the first name on the certificate, also known as the principal name, or the Common Name. This is important when the certificate will be used to provide Outlook Anywhere.
· A host record—AutoDiscover—has been created in external DNS to allow Outlook Anywhere and Exchange ActiveSync clients from outside the network to reach the Autodiscover service. For more information, see White Paper: Exchange 2007 Autodiscover Service.
· The certificate will include autodiscover.fabrikam.com as a SAN attribute on the certificate.
You should be aware that the certificate used on Forefront UAG can be from a third-party certification authority (CA) and the certificate used internally can be from a different CA, perhaps an internal, Active Directory–integrated certification authority. However for this walkthrough, although the certificate used on Forefront UAG will be from an internal certification authority, the certificate isn’t the same certificate as that used on the Client Access server. The certificate will only contain the names required by Forefront UAG to publish Exchange. Creating a certificate with just the names required by Forefront UAG avoids publishing a certificate with unnecessary FQDNs to the Internet.
Whatever choices are made about the issuer of the certificates, the Forefront UAG server must trust the certification authority that issued the certificates that are used by the Client Access server it’s publishing. If the certificates that the Client Access servers are using are from an internal Active Directory–integrated certification authority, and Forefront UAG is a domain member, this will usually be automatic. If Forefront UAG is not a domain member, or if the certificates were not issued from an Active Directory–integrated CA, then the certificate chain must be installed into the Forefront UAG local computer trusted root certificate store.
It’s also very important that the client that is trying to access Exchange through Forefront UAG trust the CA that issued the certificate used by Forefront UAG. Notice that it’s not necessary that the client trust the CA that issued the certificate installed on the Client Access server, only the certificate installed on Forefront UAG. If the SSL tunnel ends on Forefront UAG (as it must for Web publishing), the client must trust the CA that issued the certificate installed in that Forefront UAG trunk. If the Forefront UAG server then re-encrypts that traffic to Client Access servers inside another SSL tunnel, the Forefront UAG server must then trust the CA that issued the certificate installed on the Client Access server. In each case, one computer is the client, the computer requesting access to resources, and the other is the server, the computer that has the resources. The client must always trust the CA that issued the certificate used by the server in an SSL conversation.
If you are using an internal CA to generate certificates then you might have to install that root certificate onto your client computer or mobile device in order to allow it to connect to Forefront UAG. If the computer is a member of the domain where the Active Directory–integrated CA was installed, this is usually automatic. If not, the client computer may have to browse to the Certificate Services Web site if there is one, or copy it from a computer that has the root certificate so that it can be trusted.
It’s easy to check whether a computer or device trusts the certificate installed on the server. Just use a browser to connect to a published service on that server. If a certificate warning appears with just the first of the three checks performed shown as failing, the certificate is untrusted.

If you are working in Outlook Web App, you can just click Yes as shown in the screenshot to continue. Outlook Anywhere and Exchange ActiveSync clients do not usually provide this option and so will not connect. If you see this warning, you should resolve it before you try to continue.
Configuration Steps
There are multiple steps required to configure Forefront UAG to publish Exchange 2010. The following steps are included in this walkthrough document:
· Creating and installing the SSL certificate onto the Forefront UAG server
· Deciding to use a portal to access Outlook Web App
· Creating a portal trunk and publishing the first application
· Publishing additional applications
· Testing the configuration
Creating and Installing the SSL Certificate on the Forefront UAG Server
Forefront UAG requires a certificate be used to secure communications with clients. The client configuration requires that the certificate be created that uses the names mail.fabrikam.com and autodiscover.fabrikam.com. The certificate request can be generated anywhere and then imported to Forefront UAG, in this walkthrough we use the certificate wizard in Exchange to generate the certificate on a Client Access server inside the network, then export it to a file, copy it to Forefront UAG, and then install it to the local computer certificate store on Forefront UAG. The Exchange certificate wizard in Exchange makes it very easy to put the names on the certificate correctly. The wizard can be used to generate certificate requests for either internal or third-party CAs.
Creating the Certificate Request
1. By using either the Exchange Management Shell or the Exchange Management Console, you can create a certificate request for a certificate with the names mail.fabrikam.com and autodiscover.fabrikam.com.


Using the Exchange Management Shell:
Set-Content -path “C:mail_fabrikam_com” -Value (New-ExchangeCertificate -GenerateRequest -KeySize 2048 -SubjectName “c=US, s=Washington, l=Redmond, o=Fabrikam, ou=IT, cn=mail.fabrikam.com” -DomainName mail.fabrikam.com, autodiscover.fabrikam.com -PrivateKeyExportable $True)
NOTE: The use of ‘PrivateKeyExportable’ is essential to allow the certificate to be exported from the Client Access server and imported to another computer. Safe handling of certificates that contain private key material, such as those generated by using this process, is important to ensure they are not misused.
2. Use the resulting request file to request a Web Server certificate at the CA you have chosen to use.
- When you receive the resulting file from the CA, right-click the pending certificate request in the EMC, and then select ‘Complete Pending Request’. Or, you can use the Import-ExchangeCertificate cmdlet, specifying the file that the CA provided to complete the request.
NOTE: At this point, it’s important not to assign this certificate to any Exchange services because this certificate will be used on Forefront UAG, not on the Client Access server.
-
Right-click the certificate in the EMC or use the Export-ExchangeCertificate cmdlet to export the certificate to a .pfx file, specifying a password as required.
-
Transfer the resulting .pfxfile to the Forefront UAG server.
-
On the Forefront UAG server, open a blank MMC by clicking Start and then Run. In the Open box, type mmc, and then click OK.
-
Click File, Add/Remove Snap-in and add the Certificates Snap-in, When You Are Prompted for the choice of management location, select Computer account, click Finish and then OK.
-
Expand the Certificates (Local Computer) node, and then click Personal.
-
Right-click the Personal container, and then select All tasks > Import.
-
Use the Wizard to locate and import the file that you transferred from the Client Access server. You may have to change the file type the Wizard searches for from *.cer to *.pfx.
-
As soon as the certificate is imported, double-click the certificate to ensure that it opens, is trusted to the root, and shows that you have the private key for the certificate.


- Now you can choose to remove the certificate from the Client Access server if you no longer need it. Leaving a certificate there, with its private key, when it isn’t used by Exchange, won’t do any harm. But, if that certificate is accidentally assigned to services or taken and used elsewhere, it could cause problems.
Deciding to Use a Portal
Forefront UAG offers two ways to publish a Web-based application such as Outlook Web App to the Internet, either directly, where the user experience resembles that in Forefront TMG or when the user connects directly to the Client Access server, or by using the Forefront UAG portal application, where the user logs on to the Forefront UAG portal, and then clicks an additional button to open Outlook Web App.
The decision whether to use a portal or not depends on your plans for Forefront UAG and whether you plan to publish additional applications using Forefront UAG. If you only intend to publish Outlook Web App you may choose not to use a portal, and just present users with forms-based authentication at Forefront UAG and their mailbox once they authenticate. If you decide that you may decide to publish additional applications through Forefront UAG, such as SharePoint, creating a portal will enable the user to log on once to the portal and then open other applications within that portal, therefore taking advantage of the SSO capabilities built into Forefront UAG.

This walkthrough will detail the direct publishing option, where no portal is first accessed. Only Outlook Web App is visibly affected when a portal is used, both Outlook Anywhere and Exchange ActiveSync always use Basic or NTLM (Outlook Anywhere only) authentication to Forefront UAG and bypass the portal.
Configuring Authentication and Authorization Servers
The first step is telling Forefront UAG which servers to use for authentication and authorization.
-
Open the Forefront UAG management console, click the Admin menu, and then select Authentication and Authorization Servers.
-
In the resulting dialog box, click Add.

- Leave the default choice of Active Directory selected, enter a value for the Server name field that represents the authentication source, click Use local Active Directory forest authentication, and enter the base DN in Active Directory where Forefront UAG will look for user objects. To include an entire domain, use something similar to DC=FABRIKAM,DC=COM, and then select the Include subfolders check box. Finally enter the details of a user account that has access to Active Directory. It’s recommended that this user’s password be set to not expire and that this account be treated as a special security case, not subject to the usual password expiration policies.

- As soon as it is complete, click OK and, assuming you received no errors, close the Authentication and Authorization Servers dialog box.
Creating a Trunk and Publishing Your First Application
The next task in Forefront UAG to complete is creating a trunk and publishing an application. We will publish Outlook Web App only during this walkthrough.
-
In the Forefront UAG management console, right-click HTTPS connections and select New Trunk
-
Click Next at the first page of the Create Trunk Wizard
-
Select Portal Trunk as the trunk type and check the box stating that you will be publishing Exchange applications via the portal. The wording for this check box suggests we will be using a portal to access Exchange. However, configuring Forefront UAG using this wizard will result in an Outlook Web App user directly accessing Outlook Web App without first logging in to a portal.

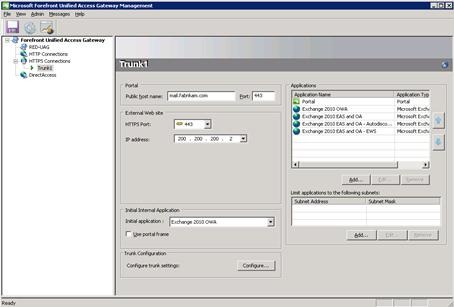
- Enter a name for your trunk. You cannot use spaces or any non-alphanumeric characters. Enter the public host name of the portal, mail.fabrikam.com in our example, and make sure that the IP address the trunk will listen to requests on is correct, that is, the external network interface of Forefront UAG.

-
Click Next, and on Step 3 – Authentication, click Add and select the entry that you created earlier.

-
On Step 4 – Certificate, make sure the certificate that you installed earlier is selected, and then click Next.
-
On Step 5 – Endpoint Security, if you have already deployed Network Access Protection (NAP) policies on your network, you may select them here or else leave the default of Use Forefront UAG access policies, and then click Next. Be aware that Endpoint Security policies only apply to Web browser clients and not to clients like Outlook Anywhere or Exchange ActiveSync.
-
On Step 6 – Endpoint Policies, leave the defaults for now and then click Next
-
On Step 7 – Select Exchange Services, select Exchange Server 2010, and check the box next to Outlook Web Access only. It’s recommended that you do not select all the check boxes to select all the Exchange services. The load-balancing method configured when publishing a farm in this manner is not optimal for Exchange. Therefore, it’s recommended that you publish Outlook Web App first and return to the wizard for Outlook Anywhere and Exchange ActiveSync following that.

- On Step 8 – Configure Application, enter an Application name–Exchange 2010 OWA in our example.

-
On Step 9 – Select Endpoint Policies, leave the default options, and then click Next.
-
On Step 10 – Deploying an Application, click Configure a Farm of application servers, and then click Next.

-
On Step 11 – Load-Balanced Web Servers, enter the FQDNs of the Client Access servers you will be publishing, and then change the Balance request by setting by clicking Cookie-based affinity. (When you run the wizard for Outlook Anywhere and Exchange ActiveSync, click IP-based affinity.). In the Paths field, you should review and remove paths you do not require.

- On Step 12 – Configure Connectivity Verifiers, choose the type of verifier you wish to use. For the purposes of this walkthrough, and for simplicity, we have chosen to use Establish a TCP session, which simply tests to see if the server responds to requests on TCP 443, and marks the server as active if it does. Forefront UAG uses the underlying Forefront TMG health monitoring features, so all configuration choices you make here are visible in the Forefront TMG management console, in the Monitoring, Connectivity Verifiers section of the console. As Forefront TMG is used for connectivity verification, much of the detail provided earlier in this document in the Forefront TMG web farm section applies, with the notable difference that Forefront UAG does not create Web Farm objects in TMG. Refer to the earlier section for additional information and information about configuration choices.

- Click Next, and on Step 13 – Authentication, click Add to add the authorization servers that you previously configured to the list. The lower option buttons determine how Forefront UAG will authenticate to the Client Access server. The default 401 request means Forefront UAG will use Basic authentication to the Client Access server. Therefore the Client Access server must have Basic enabled on the /owa virtual directory.

- On Step 14 – Portal Link, the default settings will create icons in the portal for Outlook Web App access, if a portal is used. Also, if the lower check box is selected, the portal will open Outlook Web app in a new window when it is accessed. Click Next.

- On Step 15 – Exchange Application Authorization, you can leave the default, which enables all authenticated users to access Exchange. This only means that they can try to access Outlook Web App. Any Outlook Web App policies you created in Exchange still apply, including OWAEnabled set to false. Or, you can restrict who can access Outlook Web App at Forefront UAG by selecting from a list of groups or even restrict access down to the user level by adding individual users to this list.

- Click Finish on the final page of the wizard to return to the management console.

-
Click the Save icon to save the configuration. Click the Activate icon to back-up the existing configuration and activate this new configuration.
-
If you chose 401 request on Step 13, use the EMC to open the properties of the owa and ECP virtual directories for each Client Access server being published, set the authentication to Basic, and then run iisreset on each Client Access server you have changed.


Now you can test client access to Outlook Web App works from a client connected to same network as the external interface of Forefront UAG When a client first browses to the URL you are publishing, https://mail.fabrikam.com/owa in our example, the first action is for Forefront UAG to download to the client the Endpoint Component Manager. This allows Forefront UAG to perform inspection of the client computer to make sure it meets the policies specified for the portal. The user should accept the default options the different dialog boxes present and, when complete, they will see the Outlook Web App sign-in page.


After Outlook Web App is working, we can add Outlook Anywhere and Exchange ActiveSync to the configuration. If you cannot open Outlook Web App now, review the troubleshooting steps later in this document, then return to complete the Outlook Anywhere and Exchange ActiveSync configuration.
- Open the Forefront UAG management console, and navigate to the properties of the trunk you previously created.

- In the Application section of the page, click Add to open the Welcome to the Add Application Wizard dialog box, and then click Next. In Web list, click Microsoft Exchange Server (all versions).

- On Step 2 – Select Exchange Services, in the Exchange versions list, click Microsoft Exchange Server 2010, and then select the Outlook Anywhere (RPC over HTTP) and Exchange ActiveSync check boxes. If you view the configuration later and decide you want more control over individual settings for Outlook Anywhere and Exchange ActiveSync, you can run this wizard once for each protocol. We keep them together in this walkthrough because, most of the time, when Outlook Anywhere and Exchange ActiveSync use the same authentication scheme, the settings for both are compatible.

- On Step 3 – Configure Application, select a descriptive name for the application

- On Step 4 – Select Endpoint Policies, leave the defaults for now, and then click Next.

- On Step 5 – Deploying an Application, select Configure a farm of application servers.

- On Step 6 – Load-Balanced Web Servers, enter the FQDNs of the servers in the Client Access server array you are publishing.

- On Step 7 – Configure Connectivity Verifiers, click Establish a TCP connection for the reasons described earlier.

- On Step 8 – Authentication, select the Authorization source you have previously configured.

- Accept the warning message, which effectively states that Outlook Anywhere and Exchange ActiveSync clients cannot use forms-based authentication or the portal and so will use Basic or NTLM authentication.

- On Step 9 – Outlook Anywhere, notice that the default Public Host Name values have been completed. ClickUse Basic authentication to change the default Outlook Anywhere Authentication option for both services so that Forefront UAG can delegate credentials to the Client Access server correctly.

-
On the Authorization page of the wizard, either leave the default of allowing all users to connect or click to restrict the service to specific groups or users. Again, as with Outlook Web App, any options set within Exchange by using the Set-CASMailbox cmdlet will still apply.
-
Click Finish on the wizard completion page.

- Viewing the management console, you will now see the additional application entries the wizard has created. Autodiscover and EWS have been put into rules separate from Outlook Anywhere and EAS.
When you have activated the configuration, the next step is to configure Exchange to correctly allow Basic authentication to be used against the different virtual directories required for Outlook Anywhere and Exchange ActiveSync.
- Enable Outlook Anywhere on each published Client Access server, clicking Basic authentication as the Client authentication method. After all changes are made, iisreset has been run, and event ID 3006 is logged showing that the appropriate registry keys have been set.

If this is the first time Outlook Anywhere has been enabled, several more steps are required to ensure users outside Forefront UAG can fully use Outlook. Also, one more step is required so that Exchange ActiveSync can use the Autodiscover service. You should run these on each server in the Active Directory site you are publishing, replacing the server host name as appropriate.
a) Set the external URL for the offline address book (OAB) virtual directory. It is assumed that the OAB is already enabled for Web-publishing. If it’s not, see Configure Offline Address Book Distribution Properties. Set-OABVirtualDirectory RED-CAS-1* -ExternalURL https://mail.fabrikam.com/OAB
b) Set the external URL for the Exchange Web Services (EWS) virtual directory to https://mail.fabrikam.com/EWS/Exchange.asmx. Set-WebServicesVirtualDirectory RED-CAS-1* -ExternalURL https://mail.fabrikam.com/EWS/Exchange.asmx
c) Set the external URL for the Exchange ActiveSync virtual directory to allow the Autodiscover service to provide devices with the correct value. Set-ActivesyncVirtualDirectory red-cas-1* -externalurl https://mail.fabrikam.com/Microsoft-Server-Activesync
d) Set the authentication property for the OAB and EWS virtual directories to include Basic as an option if you are using Basic authentication. Set-OabVirtualDirectory red-cas-1* -BasicAuthentication:$true Set-WebServicesVirtualDirectory RED-CAS-1* -BasicAuthentication:$true
-
At this point that you should test this configuration to make sure it works as expected. From an Outlook 2007 or Outlook 2010 client on the external network, first make sure that an A record for autodiscover.fabrikam.com exists in DNS, then make sure that Outlook Anywhere is enabled on the Client Access server in the site you are publishing and that all relevant URLs are correct, and then try to create a new Outlook profile. It’s very important to ensure that the Autodiscover service works correctly for an Outlook client because the Autodiscover service provides Outlook with the location of the different Web services it requires for usual operation, such as Out of Office settings and offline address book downloads.
-
If Outlook Anywhere works, try to connect by using a mobile device, either with the Autodiscover service configuring the profile or manually, by entering the server name (mail.fabrikam.com in this example).
Additional Configuration Steps for Exchange 2010 and/or Outlook 2010 Users
If you are not publishing Outlook Web App in your environment but do allow the publishing of Outlook Anywhere (and possibly Exchange ActiveSync) and are using Outlook 2010, you will have to make some adjustments to the configuration to allow an Outlook 2010 user to be able to access the Exchange Control Panel (ECP). Exchange 2010 users require access to the ECP for certain configuration settings, such as voice mail and message tracking information. The ECP is accessed by using a Web browser and is invoked by a link in the Microsoft Office Backstage area of Outlook 2010 or within the properties of a message. In Forefront UAG, the recommendation is to publish a new application to the portal in the trunk by using Outlook Web App as the application, and then to modify that configuration to allow the ECP to be accessed. This approach is used to ensure that the URL-analysis logic built in to Forefront UAG is correctly configured. You should also consider the following factors: · If you want to use Basic, NTLM or KCD to authenticate to the Client Access server this requires you to disable forms-based authentication on the /ECP virtual directory on the Client Access server. If you want to offer FBA for internal users at the same time, you can either make sure their DNS requests for the ECP service resolve to Forefront UAG or add a secondary Web site. This allows you to use different authentication methods on each and requires an additional IP address. For more information, see New-EcpVirtualDirectory. · If you do not want to allow any user to access Outlook Web App, but do want allow all users to access the ECP, you can disable Outlook Web App access per user by using the Set-CasMailbox cmdlet. · If you want to allow Outlook Web App access for internal users, but not allow Outlook Web App access from outside the corporate network, you must restrict the resources that you publish to allow access to only those resources that are required by the ECP. This is because the ECP uses the Outlook Web App authentication model and uses some Outlook Web App resources to function. To ensure only that the ECP can be accessed via a Forefront UAG application rule, but not Outlook Web App, run the Add Application wizard, selecting Exchange Server 2010 as the generic application and Outlook Web App as the specific application to publish. On Step 6 – Load-Balanced Web Servers, edit the Paths list to ensure that only the following paths are allowed by Forefront UAG to allow access to the ECP but not Outlook Web App: · /ecp/ · /owa/auth/logon.aspx · /owa/auth/logoff.aspx · /owa/logoff.owa · /owa/auth.owa · /owa/languageselection.aspx · /owa/lang.owa* · /owa/14* Remove any other paths added by the wizard, such as /owa, /exchange.  One additional step may be required if the trunk is only used for Outlook Anywhere publishing. Changing the setting for the initial internal application that is used by the trunk will make sure that the ECP is opened when the user logs on, not a portal containing one application, the ECP. To do this, in the Initial Internal Application list, click theApplication Name you previously created, ECP 2010 in the example shown.
  When the user takes the link to the ECP, the usual endpoint detection checks run. Then, they will be presented with the Outlook Web App–style sign-in form. When they log in, the ECP should be displayed.
Troubleshooting Forefront UAG
There are many common configuration errors made when publishing Exchange. Use this list to validate and confirm your settings. · Certificates The most common reason one or more of these clients is unable to log on, or Forefront UAG is unable to publish is because of a certificate error. Check the following: Trust Does the client trust the issuer of the certificate on Forefront UAG? And does Forefront UAG trust the issuer of the certificate on the Client Access server? If you receive a certificate warning message because the certificate is not trusted, resolve the problem by make sure the client possesses the relevant root certificate and test again. Name Mismatch If you receive a warning message because the name on the certificate does not match the name the client was expecting to see, resolve the problem by reissuing the certificate with the correct names and test again. Expiration Dates If the certificates have expired, the client will not accept their use. Check the expiration dates and reissue the certificates if necessary. · Matching Authentication Schemes If Forefront UAG is configured for Basic (or 401 in Forefront UAG terminology), the appropriate virtual directories on the Client Access server should be configured to support Basic authentication. · DNS Are the A records for mail and autodiscover in the correct zone? And do they have the correct IP address? The IP should resolve to the external network adapter of Forefront TMG and, more specifically, to the IP address of the listener configured on the Exchange publishing rules. · The Test Email AutoConfiguration tool Use this Outlook tool to confirm that the Autodiscover service can be contacted and that the URLs it returns are correct. To use the tool, hold down the CTRL key, and then right-click the Outlook icon on the taskbar.  · Use the Exchange Remote Connectivity Analyzer tool If the environment is Internet facing, see Microsoft Exchange Remote Connectivity Analyzer to test the configuration from the Internet. · Eliminate single server issues If you are publishing a farm of Client Access servers, reduce the farm size to just one Client Access server and test again. This makes troubleshooting much easier because it’s easy to determine which servers are involved in the connection attempt. · Use the Forefront UAG Web Monitor tool You can use this tool to view the state of each member of the farm and look for errors messages in the event log. · Check whether Forefront UAG is blocking URLs or content within URLs If you see a message similar to “you have tried to access a restricted URL”, try the following approaches to narrow the problem down: Use the Forefront UAG Web Monitor Look for events that relates to the problem and that indicate the rule or filter that is blocking the content by using the Forefront UAG Web Monitor
 https://localhost:50002 on the Forefront UAG server. Bypass URL set-checking for a particular application This will narrow down the source of the issue. You can disable URL set-checking per application by clicking Evaluate with enforcement on the Web Settings tab of the application being published.
Migration Considerations
If you are migrating from an earlier version of Exchange and are following the standard Exchange migration guidance at Upgrade to Exchange 2010 are using an additional legacy namespace, some changes are required in Forefront UAG to ensure a smooth migration. The exact configuration that is required will depend on the clients and protocols in use. Outlook Web App for example has a built in Single Sign On (SSO) capability when you deploy it alongside Exchange 2007 in the same Active Directory site, or when an Outlook Web App request for a 2003 mailbox is received. Accessing a mailbox hosted on Exchange 2003 or Exchange 2007 using Exchange ActiveSync or Outlook Anywhere can be performed through an Exchange 2010 Client Access server, although in some scenarios, you may choose to provide access through an Exchange 2007 Client Access server to users who have mailboxes on Exchange 2007. It’s fairly simple in Forefront UAG to support the Exchange SSO functionality for Outlook Web App within the context of one trunk. However, it’s not possible to publish multiple versions of Exchange ActiveSync or Outlook Anywhere through one trunk. Therefore, it’s recommended that you provide access to legacy clients using Outlook Anywhere or Exchange ActiveSync through Exchange 2010. It’s important to understand that at a basic level, the standard approach is to move the existing external namespace to point to Exchange 2010, and use the newly created ‘legacy’ namespace to access earlier versions of Outlook Web App. All access to Exchange ActiveSync and Outlook Anywhere will be through the existing namespace, and Exchange 2010. Using Native Exchange SSO Redirection There are several steps required to configure this scenario: 1. Ensure that the certificates have the correct names. 2. Create a new application for publishing the legacy version of Exchange. 3. Configure Exchange to provide the redirection URLs. In this scenario, forms-based authentication is still being performed on Forefront UAG. Therefore, forms-based authentication on both Exchange 2003/Exchange 2007 and Exchange 2010 must be disabled, and either Basic or Windows Integrated must be enabled, depending on the delegation settings, or Forefront UAG must be configured to delegate forms-based authentication as discussed earlier in this document. It’s important to understand that using the built in Forefront UAG method of SSO requires both versions of Exchange be published on the same trunk. Ensure Certificates Have the Correct Names The first step in enabling SSO when using Forefront UAG is to ensure that the certificate you are using on the Forefront UAG trunk has all the names you must have to support the scenario. In this example, we will add legacy.fabrikam.com to the certificate, and use that FQDN to redirect users who have mailboxes on Exchange 2003 or Exchange 2007 to access their mailbox.  Add a New Application to Publish the Legacy Version of Exchange In order to enable the legacy version of Exchange to be accessed through Forefront UAG, it must be added to the portal, with the new host name and must be configured to publish the legacy Exchange Client Access server or front-end servers. 1. In the Applications section of the trunk you previously created, click Add to add the new application, and then click Next at the Welcome screen.
  2. In the Web list, click Microsoft Exchange Server (all versions).
  3. On Step 2 – Select Exchange Services, in the Exchange version list, click Microsoft Exchange Server 2007, whether you are publishing Exchange 2007or Exchange 2003. If you select Exchange 2003, you will not be able to select a different host name (legacy) later in the wizard. Notice how the ability to select multiple Exchange services is unavailable when publishing legacy versions of Exchange.
  4. On Step 3 – Configure Application, name the application.
  5. On Step 4 – Select Endpoint Policies, click Next. 6. On Step 5 – Deploying an Application, click Configure a farm of application servers, and then clickNext. 7. On Step 6 – Load-Balanced Web Servers, enter the FQDNs of the Exchange 2003 or Exchange 2007 servers that you are publishing. In the Public host name box, change the default value to ‘legacy’ (or the name you are using for the legacy version of Exchange when accessed from outside the network.
  8. On Step 7 – Configure Connectivity Verifiers, select Establish a TCP connection, and then click Next. 9. On Step 8 – Authentication, select the authentication server source that you previously defined, and then clickNext. 10. On Step 9 – Portal Link, leave the defaults, and then click Next. 11. On Step 10 – Authorization, again leave the defaults (or change them if you choose to do this), and then clickNext. 12. Finish the wizard, and you will be returned to the Forefront UAG console. 13. Click the Activate Configuration button and prompt to back up the configuration when it is requested. Configure Exchange 2010 to Provide the Redirection URLs Next, if you are migrating from Exchange 2003 to Exchange 2010, on all the Exchange 2010 Client Access servers being published, set the Exchange2003 URL property on the owa virtual directory to match the value of the legacy URL you are using, In this case, https://www.alitajran.com/configure-internal-external-url-exchange/. Set-OWAVirtualDirectory RED-CAS-1* -Exchange2003URL https://www.alitajran.com/configure-internal-external-url-exchange/ If you are migrating from Exchange 2007 to Exchange2010, make sure that the externalurl parameter on the Exchange 2007 Client Access server OWA virtual directory is set correctly. Set-OWAVirtualDirectory RED-CAS-2007* -ExternalURL If you are migrating from a mixed Exchange 2003 and Exchange 2007 environment to Exchange 2010, you should first make sure that all Exchange 2003 access is through the Exchange 2007 Client Access servers. This is the norm when you migrate from Exchange 2003 to Exchange 2007. In this scenario, and when both the previous commands are executed, Exchange 2003 users will be redirected to the /exchange virtual directory on the Exchange 2007 Client Access server and Exchange 2007 users will be redirected to the /owa virtual directory on the Exchange 2007 Client Access server. This allows all three versions of Exchange to be accessed through a single URL, https://mail.fabrikam.com/owa. Note: If a user tries to browse to https://mail.fabrikam.com/exchange, as would be the case for an Exchange 2003 user who had bookmarked the page they previously used, they will be automatically redirected to https://mail.fabrikam.com/owa and provided with a form they can use to log in. Configure Authentication On all the Exchange 2003 and Exchange 2007 front-end or Client Access servers being published by the new application, you should disable forms-based authentication and enable Basic authentication to enable Forefront UAG to delegate credentials correctly. On Exchange 2003, you disable forms-based authentication by navigating to the Administrative Group, Servers,Servername, Protocols, HTTP, Exchange Virtual Server object, then selecting properties and clearing the check box. Basic authentication is enabled by default, so no changes other than running iisreset are necessary.
  On Exchange 2007 Client Access servers, you can disable forms-based authentication and enable Basic authentication by changing the properties of the four relevant virtual directories, either in the Exchange Management Console or the Exchange Management Shell.
  The change from FBA to Basic authentication must be completed on the owa, Exchange, Exchweb, and Public virtual directories. After making these changes you must run iisreset. Ensure DNS is Correct and Test the Configuration Ensure that the A record for legacy.fabrikam.com in external DNS resolves to the same IP address as mail.fabrikam.com. Test the 2007 configuration by navigating to https://mail.fabrikam.com/owa and logging on to an Exchange 2007 mailbox. You should be silently redirected to and automatically logged on without additional prompts for credentials although you will likely be prompted to accept the new FQDN of the portal as trusted.
  Test the Exchange 2003 configuration by navigating to https://mail.fabrikam.com/exchange or https://mail.fabrikam.com/owa, and then logging on to an Exchange 2003 mailbox. You should be silently redirected to https://www.alitajran.com/configure-internal-external-url-exchange/ and automatically logged in without prompts for credentials.
  If you access Exchange 2003 through an Exchange 2007 Client Access server and, when you log on to Exchange 2003, are redirected and logged on but see issues with the images within the session, as shown, you should take one additional step.
  In the Forefront UAG management console, open the OWA 2003/7 application and navigate to the Web Settings tab. Check the box for Evaluate without enforcement, under the Verify URLs check box, then click OK and apply the configuration to Forefront UAG. You should then be able to access Exchange 2003 mailboxes through Exchange 2007 without any issues.
 This issue occurs because the built-in URL filtering mechanism Forefront UAG uses for OWA 2007 does not correctly apply when an Exchange 2003 mailbox is accessed through an Exchange 2007 Client Access server. Exchange ActiveSync Migration As previously discussed, when publishing Exchange using Forefront UAG and migrating from legacy versions of Exchange to Exchange 2010, it’s generally recommended that you provide all access to Exchange ActiveSync clients through Exchange 2010. It’s not possible to publish more than one application providing Exchange ActiveSync within the same trunk. However, you may decide—perhaps for pilot and testing reasons—that you do have to publish multiple versions of Exchange ActiveSync through Forefront UAG at the same time. Of course, you can do this if you create a new trunk, with a new IP address, certificate, and so on, and configure the application appropriately. Just follow the steps described earlier in this walkthrough to create a new trunk and publish a new application. Outlook Anywhere Migration As previously discussed, when publishing Exchange by using Forefront UAG and migrating from legacy versions of Exchange to Exchange 2010, it’s generally recommended that you provide all access to Outlook Anywhere clients through Exchange 2010. It’s not possible to publish more than one application providing Outlook Anywhere within the same trunk. However, you may decide—perhaps for pilot and testing reasons—that you do have to publish multiple versions of Outlook Anywhere through Forefront UAG at the same time. Of course, you can do this if you create a new trunk, with a new IP address, certificate, and so on, and configure the application appropriately. Just follow the steps described earlier in this walkthrough to create a new trunk and publish a new application. Remember that the recommended scenario for the migration itself is to just move the existing Outlook Anywhere endpoint that your clients use to Exchange 2010, and allow Exchange 2010 Client Access servers to proxy connections back to legacy versions of Exchange when needed. Exchange 2003, Exchange 2007, and Exchange 2010 users can access their mailboxes by using Exchange 2010 Client Access servers. Therefore, the simplest approach is to publish just Exchange 2010 as the Outlook Anywhere endpoint because the configuration of the client does not have to change—either at the beginning of the deployment when the Exchange 2010 Client Access server is introduced or when their mailbox is moved to an Exchange 2010 mailbox server. If you decide, for whatever reason, you have to have separate namespaces for Outlook Anywhere, consider the following: · Users who have mailboxes on Exchange Server 2010 cannot use Outlook Anywhere through an Exchange 2003 front-end server or an Exchange 2007 Client Access server, because neither of these versions of Exchange understand the RPC Client Access Service component in Exchange 2010, and. So, they do not consider the endpoint the client is trying to reach as valid. · Outlook 2003 does not use the Autodiscover service to update or change any configuration settings. So, if a mailbox is moved between versions of Exchange and different Outlook Anywhere endpoints are used, the client profile will break and prevent access. · Outlook 2007 clients sometimes cannot correctly update the Outlook Anywhere settings following a move between two Outlook Anywhere–enabled endpoints. For example, if you were publishing Exchange 2007 and Exchange 2010 by using different Outlook Anywhere host names, and a user’s mailbox were moved between Exchange 2007 and Exchange 2010, the client may not correctly update the host name used by Outlook Anywhere. The standard recommendation of moving the existing namespace to Exchange 2010 and allowing Exchange 2010 Client Access servers to access all legacy versions of Exchange means very little user impact and minimal client configuration changes. Learn more about Agile IT’s proven on-prem Exchange Consulting.