Setting up Windows Virtual Desktop (Demo Video)
At long last, Microsoft announced that Windows Virtual Desktop is now in General Availability, meaning you can now deliver the ONLY true multi-user windows 10 experience to your users. We have been working with Windows Virtual Desktop since the early preview stages and covered What is Windows Virtual Desktop back in March. WVD allows you to set up scalable, single multi-user Windows desktops in Azure, helping reduce costly refresh cycles, increase device security and facilitate remote or temporary workforces with ease. In this Tech Talk, we walk through how to set up your first windows virtual desktop hostpool and devices, then walk through the user experience with Managed Desktop, BYOD mobile devices, and in containerized applications.
Build it for power!
Have a marketing guy who wants to edit 4k video on his Surface Pro 4? Give them a Windows Virtual desktop with 64 cores, a TB of memory and a couple of Nvidia GPUs.
Scale it for cost savings!
You can configure windows Virtual Desktop resource banks to maximize resource usage. This is ideal for environments where multiple users may share a computer over multiple shifts, or move between computers throughout the day, such as Hospitals, retail stores, call centers or factories.
Use it for security!
Windows Virtual Desktop is a great tool for security and provisioning temporary workers. Since the desktop exists in Azure and not the local machine, you retain granular control over application access and the remove ability for end users to mis-manage you company’s data.
What does Windows Virtual Desktop cost?
Windows Virtual Desktop is included in a number of Microsoft licenses, including Microsoft 365 F1 for Firstline Workers, which is one of the most affordable license types available. After the eligible license, you just pay for the Azure VM.
Windows Virtual Desktop Licensing is included in:
- Microsoft 365 E3/E5*
- Microsoft 365 A3/A5/Student Use Benefits*
- Microsoft 365 F1*
- Microsoft 365 Business
- Windows 10 Enterprise E3/E5
- Windows 10 Education A3/A5
- Windows 10 VDA per user*
* = Eligible for accessing Windows Virtual Desktop from non-Windows Pro devices.
Azure Pricing for Windows Virtual Desktop
With WVD, you only pay for the VM, storage and networking needed. There is no upfront cost, and you can take advantage of Azure Reserved Instances for savings up for 72%! (Estimated per-user costs for multi-user WVD deploytments is $20-$35/month, while single user instances are estimated at $35-$65/month)
Setting Up Windows Virtual Desktop
There are four stages to setting up WVD for the first time.
- Creating your master virtual hard drive (VHD) image
- Configuring the WVD host pool
- Configuring the Virtual Machines
- Adding apps, people, and groups
Creating a Virtual Hard Disk (VHD) Image
There are two ways to prepare a VHD image for use in Windows Virtual Desktop. Microsoft has excellent guidance in it’s official documentation.
Configuring the Windows Virtual Desktop Host Pool
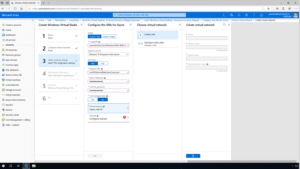 Windows Virtual Desktop is configured from your Azure Portal.
- Create a new resource by clicking +Create a Resource
- Search for “Windows Virtual Desktop” in the search bar
- Select “Windows Virtual Desktop- Provision a host pool”
- Read the Provision Host pool service description then click “Create”
- Set Hostpool name
- Select WVD Availability Region
- Choose your subscription
- Select an existing resource group or create a new one.
- Select your location
- Configure the number of VMs and Usage profile
- Select Light / Medium / Heavy usage
- Enter the number of users
- Select a virtual machine size
- Set your virtual machine name prefix
- Configure WVD VMs
- Enter the VHD image URI from step one.
- Select your session host OS
- Choose between HDD or Solid State Drive
- Enter Domain User Principle Name (UPN)
- Set an admin password
- Select weather to use managed disks or not.
- Choose or create a virtual network for WVD
- Configure Subnet
- Set up WVD tenant information
- Define Tenant Group
- Name the WVD Tenant
- Set User Principal Name (UPN) *note this is separate from the Domain UPN
- Set and confirm new UPN password
- Overview Summary
- It is strongly recommended to download the WVD Template and parameters
- Buy!
- Review terms of service and click create!
Adding Users, Apps and App groups to Windows Virtual Desktop
It is strongly recommended to use PowerShell to configure Apps and Users on Windows Virtual Desktop. Microsoft has great documentation in the WVD Docs. Using powershell makes it easy to redeploy machines in the future as well as apply change control procedures to your deployments.
If you are interested in how Windows Virtual Desktop can help your organization provide a secure modern desktop experience to your users, and want help getting started, contact us today!
Published on: .